Sunday 22 November 2015

Brigade Commander

Our second game was something rather different from the first, what with using 1:300th moderns instead of 15 mm ancients, and with a new rules set to boot in place of my usual Modern Spearhead. The rules are called "Brigade Commander",  and cover both WW2 as well as moderns; Aaron suggested I take a look at them, because he had heard they were fast play. 

Initial set up, from behind my right flank.
We have a great problem when we pay Modern Spearhead in that we seem to take over an hour a bound on average, so getting a game actually fininished is a real task. I'm not one for trying new rules out willy-nilly, but something clearly had to be done, so I took a stab - they are a ten buck downloadable pdf, so I wasn't going to exactly break the bank taking a look. A quick once-over gave me the impression that would indeed be fast, and they also had a couple of mechanisms that were rather similar to a homebrew set I made back in 1989/90, so that was another plus: one was having attachments one lower down the command chain represented as smaller bases tagging along with the big base (only my rules were a "Division commander" equivalent, so one level higher up the command chain). Another was having effectiveness of fire vary with relative technology as opposed to have fixed effects - this is exactly the way forward IMNSHO, so I don't understand why more rules writers don't adopt it. I am doing the same in my may-they-ever-see-the-day ancients set too.

On the other hand, some bits were really confusing - especially the unit displacement rule - when you first spot a defender, it gets moved randomly to a slightly different position.  We just couldn't get our head around that one - why should a defending unit hiding in cover be teleported outside of it when it is first seen? So we just ignored that one.  (Maybe we simply didn't understand it properly - our brains aren't what they were when we were younger...)

Being a plonker, I left my printed-out copy at work, naturally, but we could still access the electronic version to play -  internet to the rescue! We rolled up our forces pretty well much randomly, going "by the book". I had Aaron's Americans as "stretched", so his force would be smaller (but naturally, the tanks are way better - their 105s are vastly superior to my 100 mm guns); my Czechoslovakians infantry/MICVs had a miniscule advantage over his infantry in M113 APCs in that I could let off anti-tank fire at a greater distance - needless to say, I never got to use it...

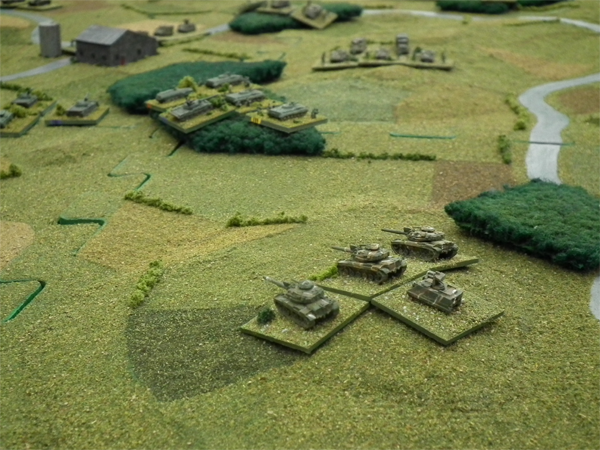
Yankee mechanised company in front of a T-55 company.
I planked down some terrain - which was four of my terrain mats, giving a 1.2 by 1.2 m board (i.e. 4 foot a side) with forests made of carpet tiles thrown over the top; these last I snagged from Rhys when I was last back in NZ, since they were now surplus to his requirements.  We ignored any hedgerows, given the basic unit was a company, rather than a platoon as in MSH. We also ignored difficult fields, but that was more because we entirely forgot about the possibility of having them being difficult!  It was one of a number of things we forgot during the course of the day (e.g. I couldn't find any of my bridge models, so no rivers could be used).

Aaron's game objective turned out to be "hold area against enemy" - he chose a hill just on his side of the centre line that had a good view of a lot of the board to be the key location.  Mine objective to exit at least 1/4 of my companies off his baseline.  I got two extra companies in compensation for him being able to take a defensive stance, further inflating the numbers discrepancy (he had 6 companies on table at the start, plus one as reinforcements; while I had 8 plus 3, respectively). The recommended 'base size' of company is extremely hazy in the rules. They talk about 1", 2", and 3" bases sizes in a single passage...  Since there is at least a defined ground scale (1" = 100 yards), I took that into consideration when decreeing we would use three MSH bases to represent a standard company, with ranges being taken to and from the middle one; the flanking ones would be to make sure they occupied a realistic amount of space.

Turn 6. Aaron (top) has been forced to retreat numerous times.
I had some good initial luck with me being able to get a good march onto the table through a timely "scurry" where everybody got to move:  this would appear to be, relatively speaking, generally better for the more numerous side if it happens on the first time - normally you get only three company activations a turn, so usually a smaller force gets a smaller proportion of its units to move. The first few turns saw most of our more lethal artillery assets (of which I had more) exhausted; whether it was wise to do so initially or later I didn't know, give it was our first game. And since this was a first game, there were no doubt many things we stuffed up rulewise too...

Once we really started coming to grips with each other, I kept scoring 1s or 6s on my "shock" dice, forcing Aaron's units to fall back constatantly. In fact, it looked like he was running out of room to retreat at some points, with some of companies falling back even beyond his HQ. On the other hand, my poor tankguns meant I was never in a position to land any "kill" dice on him, and my few assaults didn't work out. On the few occasions Aaron was able to actually get some shots of with his M60A1s, he was able to rip up my guys handily. I forgot to bring my smoke markers, so that part of the visual spectacle was AWOL; in the above picture we are using little 5 mm-a side coloured cubes to represent unit status. This should be done with appropriate dust, smoke, and fire markers...

Goddam Yankees! The American's are Aaron's own figures.
Anyway, I was making quite a lot of ground, but was taking quite a lot of casualties in the process. Eventually however, I not only started taking too many casualties, but got some "firefight" activations that prevented me from actually doing anything useful just when Aaron seized the initiative with a freshly rallied tank company that went on a rampage down my right flank, smoking up two companies in front of them, then sweeping round my flank (see left) and taking out two more.  Ouch!

Things were really really really not looking good for the Czechoslovakians at this juncture...
The casualties (Aaron's sole company lost at top).  Not pretty...

Now technically, I did complete my objective - I did get 3 companies of Aaron's baseline. But since he not only held his hill, but had but a single company rendered hors de combat while doing so, while I had lost seven (!) in getting my three off table, it was clear who the real winner was!

So what did I make of the rules? Well, they were indeed fast play. Very fast. You get maybe 6 to 12 companies total, and they are digital: they are either alive, or dead.  So no fiddling about with 'casualities' or the like as platoons get whittled down. No 'morale' as such to speak of, either - combat results can force you to halt, or retreat, but only on a company by company basis. And this is all fine. I'm not sure I like the way artillery was handled - will have to investigate more. Likely we mishandled it...

There are lots of things I would tweak in terms of 'army list' design - I think not having lots of attachments is likely to be more of a wasted opportunity than a useful simplification, but further play-testing will be required. Even if I don't end up liking everything, there is a solid core here that is very much worth investigating. The fact that we could slap a game together, starting with generating an OOB on paper, to packing it away after the game, in something like 4 hours maximum, was quite the revalation. It would probably take me 2 days to do that with MSH...


Populares!

Finally, some gaming! A welcome opportunity to get down to Aaron's came about today, so I packed the car with some 1981 Czechs and my terrain mats, while Aaron got some ancients stuff organised. The moderns game I will comment on in my next post, for first up was a game of "To the Stongest", which I have played just twice before, but thoroughly enjoyed it.

Aaron has by now built up a very respectable collection of late Republican Romans indeed, plus a bunch of western European enemies and allies. So I thought a game featuring the noble and glorious Sertorius on one side (that would be me, you understand), versus the villainous and unnamed optimates (Aaron, naturally...) would go down well. Aaron proposed a points budget of just 130 points each to keep things simple, so we had to cut down a bit on the troops present - Sertorius wasn't rated as "brilliant" for example.  My army, having large numbers of Lusitanian caetrati (light infantry) was a bit bigger than his, due to his larger numbers of more expensive legionaries.

Deployment, viewed from the rear of my left flank.
We rolled terrain as per the rules, and I was pretty satisfied with what I got; the flanks were dominated by rocky hills and the like, just right for my light troops to lurk in. Note the mats making up the playing field - see Aaron's post on these for details.

My centre was anchored between theses hills, as I thought it would be weaker than his, and I wanted to work the flanks. I had a unit of heavy horse and a unit of light horse on each flank, plus a bunch of light troops. Sertorius took my right, while the left and the centre had a sub-general each.
My light horse on the extreme right, working the flank.

As it turned out, Aaron's horse was slightly meatier than mine, with three heavies and one light unit as opposed to my two of each. Still, I had a lot of light troops to support them, and I figured the terrain was with me, so I pressed forward on both flanks, while keeping my centre back.

On my right, I moved up quickly, aided by Sertorius being there in person, keeping the activation points coming. Combat didn't go quite so well, however, with no rapid breakthroughs. I attempted some outflanking manoeuvres here, but not mcuh came of it, as my heavy cavalry were struggling, and Aaron was able to manoeuvre his own heavy cavalry to advantge. Soon my heavy cavalry here had been removed from play, and Sertorius had to transfer to the light horse, leaving my grand plans for attack in this sector in tatters.

The flanks are fully engaged, but the centres have yet to meet.
On my left, I similarly moved forwards, but failed to make any headway with my shooting.  Our cavalry clashed, and it was a more bloody affair than of the other flank.

I was able to take out Aaron's sole light horse unit, but unfortunately lost not only my own in the process, but also my general in the aftermath, thus starving my forces here of leadership. Over the subsequent turns Aaron was able to take out my heavy horse as well, but his remaining horse unit was unwilling to try and force the issue with my lght infantry holding the heights, stimmying his advance.

The view from behind Aaron's centre. All figures are his.
Having been bested on the flanks, my remaining hope lay with the centre. As it happened, I was not as weak here as I had feared I would be. We both had solid line of legionaries. Aaron had a second reserve line of veteran legionaries, but they were few in number. My second line was of Spanish scutarii, and thus not as strong, individually, but they were much more numerous, and thus could potentially take more of a beating before folding. So I moved forwards my centre to meet his, and the main lines clashed. The initial voleys of thrwoing weapons were resisted stoutly by both sides, and thus our front lines settled down to sword play.

The breakthrough! That's my sub-general rolling up his line...
And here luck went my way. Aaron's units could hit me well enough, but I saved an awful lot of hits, while my return strikes often went unsaved by him. Further, his activations went AWOL at critical points, leaving him unable to rally units, and leaving them very vulnerable to subsequent attacks. On my right flank, the crappy terrain frustrated him in being able to move his cavalry across to influence the centre, and likewsie on my left, the crappy terrain frustrated him there too. Terrain in hindsight that had been very well-positioned by myself! My superior numbers in the centre eventually wore his down, and a line swap did little to stem the tide, for his veterans were too few in numbers to resist my weightier centre. Eventually the legion led by my sub-general routed their oppoistes, cracking his line open, and the proverbial fat lady started winding for her aria...

Technically not yet "game over", but irretrievable...
With his centre split and being rolled up, soon four more of his six original legions routed, with just his own center general's legion holding on - barely. And with the equivalent of five legions in front of it, the writing was not merely on the wall, but spelled out a hundred times all over the forum...

A corker of a game, with lots of interesting decision points; a bunch of realistic outcomes, (with no senior general on the Roman side, Sertorius won, as he was wont to do...), and nothing happend on the table that jarred my sense of historical accuracy. I'm liking this system more and more! I guess the next step is to see how well it plays outside the classical Mediterranean...

Aaron's take here.