Saturday, 19 December 2015

Legionary: Gods & Emperors

I don't read much fiction, on the whole. This is partly because I no longer have the large chunks of time necessary to devote to reading something relatively long in one go, which is they way I prefer to read a story, especially a novel. And it's partly because I no longer have much "free" time full-stop, and it has to be rationed fairly carefuly against other competing interests, like research.

Image nicked from Amazon.co.uk
But that doesn't mean I'm closed off to the genre even now. I've just finished "Legionary: Gods & Emperors" by Gordon Doherty, which is an historical novel set in 378 AD. The battle of Adrianople in other words. The novel is actually 5th in a series, but works fine as a stand-alone tale. And I only knew of the existance of this one because the author sent me a copy... Why? Because a) he's obviously a nice guy, and b) because he's an amateur historian like myself, and has found some of my work useful in his research: I get a thank you mention in the book's forward :-)

Now, as a genre, historical fiction (not to be confused with fictional history) has some unique constraints - the most obvious being that the reader is quite likely to know in what ways many of the major plot components are going to work out even before they have made it a couple of pages into the book. And in particular, if you are someone like me, you just know that near the end of the book that some dude called Valens is not going make it out of a particular burning farm house alive...

(Of course I'm aware of the other report of his death, but that's nowhere as interesting, so it's unlikely to make it into a fictional account!)

So part of the excitement of reading the thing isn't figuring out these plot elements, as such, but seeing how the author will weave his tale around them. And in this case, I came away pretty satisfied. Without giving too much away, Valens is depicted in a reasonably positive light, and this contrasts very much with Gratian's characterization, which would fit right in with a Nero or Commodus.

And judging by the reviews on Amazon, I'm not the only who came away satisfied after reading this book - the reviews there are so positive, I feel no need to add my own. So I will here go a little into the more historical than literary aspects. The author keeps, for the most part, titles such as ranks in the original latin, so tribunus instead of tribune, but centurion is retained. I guess centenarius (not centurio, note, this being the 4th century!) would just confuse the reader. I don't mind this - it is fairly standard to see this sort of thing in strictly historical analyses too. More grating, at least initially, was seeing all the palatine infantry legions referred to as auxilia. Now there is every excuse to call auxilia palatina units "legions", because they were frequently so-called by the Romans, not just by poets like Claudius, but by staff officers such as Ammianus.  But the reverse is a bit jarring - and would have certainly struck a Roman legionary as simply wrong - there were clear legal differences in being an auxiliaryman and a legionary, even if they were "legacy" features that made no real sense in a 4th-century context. But ultimately that's a detail that the (somewhat mythical) "average reader" is unlikely to care about, even if it was pointed out to them, and I can certainly see why it's there - it's of no import to the story at all, and drawing attention to the distinction would only confuse things. So I came round to accepting it, no problem. But I would have done it the other way around, simply not mentioned auxilia at all, and just have the lot as legiones. But here I'm straying into the reviewer's cardinal sin - talking about the book they would have written, and not the one actually under review...

I noticed a few typos: a couple of places where "to" was confused with "do", and the odd missing quote mark - a legacy of my being a professional proof-reader for nearly 4 years in my thirties is that it's hard for me to miss these...

But anyone reading this blog is going to be glad to have read this book, I reckon. It's 2 quid on Kindle; 11 if you are going for the paperback. It's 407 pages (not counting blurb, appendices, etc), and the font size and spacing is reasonably generous; but now that I'm getting older, I need my reading glasses on to read it in anything other than outdoor sunlight...

Wednesday, 9 December 2015

Some moderns painted!

I've finally got around to doing something constructive over the last two weeks in terms of converting lead (and plastic) into fieldable forces. The catafracts still lying on my sidebench still looked too daunting a task for just a few evenings, so I went to my moderns trays to see what could be fruitfully pushed forward.

First up is another MSH battalion's worth of DANA vz.77 152 mm gun-howitzers to add to the one I already have. These are the Heroics & Ros 1:300 th scale model that was released in late 2012. For this second battalion, I've put the gun into travelling position (the barrels can also be positioned elevated). The previous battalion is intended tp represent a battalion from the 4th Army's 332nd Artillery Brigade; they received their DANA's only in 1985. This second battalion represents one of the divisional artillery battalions from either the 1st Tank Division or the 20th Motor Rifle Division; these being the best equipped of the Czechoslovakian divisions; they received their DANAs in 1980.


Next comes a PM-55 bridgelayer. This is a model by Karl Heinz Ranitzsch, aka Dragoman, done, like all my Shapeways purchases, in the cheapest plastic available - nylon-12 (aka Shapeways' "white strong & flexible").  The PM-55 is essentially a truck-borne version of the MT-55 bridgelayer, and thus suitable for MBTs to cross. WarPac MBTs at any rate; with a rating of 50 t, some western MBTs would be straining things... A model like this is only required for the single game turn it takes to set the bridge up - but it's such a beautiful model, I couldn't resist. The truck concerned is the Tatra-813 ("Kolos") 8x8 vehicle in production from 1967 to 1982, and with exceptional off-road capabilities due to its tubular frame split axle configuration. Karl Heinz sells not only the unfolding version shown above, but also a version in travelling configuration (plus a deployed bridge section).

And here is the travelling version... The PM-55 routinely sports a earth moving blade at the front to prepare the approaches to the bridging position, and Karl Heinz' model comes equipped with this. Like many Czechoslovakian pieces of equipment, the PM-55 saw some degree of export success, and this is why Karl Heinz models it - it served with the NVA (East German army).


And this is Karl Heinz' model of the AM-50, a lighter VLB that is also based on the T-813, and more suitable for infantry units being carried around in APCs. Like the PM-55, he sells an unfolding version; I've already paointed one of those up - you can see it in action here. The AM-50 was first trialed in 1972, with more substantial numbers coming in1974.

This is an attempt at making a vz.53/59 self-propelled AA gun. I've taken an H&R (?) BTR-152 model, and sawed off the back. Then I've stuck a ZPU-23/2 on top, and stuck on plasticard box on top of that to represent the distinctive ammo bin, and added some crew members from the artillery crew pack, The guns are noticeably too small (to me, anyway), since the vz. 53/59 sports twin 30 mm cannons, as opposed to 23 mm, and the curving superstructure on the left of the mount is missing in my model (not that you would see it from this angle, even if it was there...). IIRC, I've now made up sixteen of these conversions; this is the last, and will form part of my 183rd Battery of the 82nd AA Brigade - this unit was primarily equipped with SA-4s, but also had some SPAAGs for close-in air defence. The Czechoslovakians used this instead of the ZSU-57-2, which offered them no advantages. However, they never replaced it with anything more modern (such as the ZSU-23-4), and its lack of radar would have meant it would have had severe problems keeping enemy aircraft at bay in any conflict in the 70s, let alone the 80s. The Czechoslovakians trialed the SA-4 from 1974, and the 82nd AA Brigade went operational in 1976 (the 2K11M, i.e. "SA-4b Ganef").


The two vehicles are my own creations, printed out by Shapeways. They are Tatra 815 VT 8x8 prime movers, distinguished from the T-815 VVN truck mostly by having a shorter deck but a longer cab, so it can accommodate an entire howitzer crew. The T-815 series (also available in 6x6 and 4x4 versions) suceeded the T-813 starting from 1981, and going into full production in 1983. In addition to hauling artillery pieces, it could also be used to tow tank-transporter trailers, etc.

I think this is what Skytrex called a "BTS-M"; it's a PTS-10 light ferry as far as I am concerned. It's a fairly large model, hence the double-depth base. My bases are usually 30 mm square by the way; no way am I using Imperial measurements! The model has an odd lean forwards, as if it's braking extremely hard. Two of these models get used as part of the Pontoon Company of my Czechoslovakian 3rd Division's Engineering Battalion (along with a whole bunch of truck-borne pontoon elements).


And this is, IIRC, a Skytrex GSP-55 heavy ferry set. These are found in the (river) Assault Company that was added to Czechoslovakian divisional Engineering Battalions from 1979, along with extra PTS-10 light ferries.

Another artillery battalion... you can never have too many as a WarPac player! The tractors here are another of my own products printed out by Shapeways: the ATS-59G. The ATS-59G was the first 3-d printing effort I tried, and it still holds up reasonably well compared to my later creations.  You can see a close-up of the vehicle's rear below.


Now when your artillery is as ancient as these pieces, you need a lot of them to have any hope of doing anything! This is the H&R M-30 122mm howitzer (I think they call it something like mk. 31/37), or the vz.38 to the Czechoslovakians. These pieces were found in the artillery battalion of the motor rifle regiments: 3 batteries of 6 pieces, which translates to 4 models in MSH. The vz. 38 designation tells you they are a 1938 production piece, so they have, by 1970s and 80s standards, a truly horrible range. These pieces soldiered on until the demise of the Czechoslovakian state (there were grand plans to replace them with 2S1s in the late 70s/early 80s, but few of these were actually purchased). My close-in eyesight has detriorated markedly over the last two years, so I now need separate glasses to paint with. Even so, I found I couldn't be bothered painting the faces on the crewmen here - I just couldn't see them! And I certainly can't see them at a gaming arm' length away...

This would appear to be a T54 or T55-based ARV vehicle, but I can't remember which manufacturer it is... probably Scotia.

While this would appear to be a T-34-based ARV. Again, not sure who makes (or made) it. A platoon's worth of vehicles like this is part of each tank or motor rifle regiment's enegineering company; more are found in the divisional Engineering Battalion's maintenance company.

The towed tank here is I think a Scotia POL trailer, while the tractor is another of my Shapeways creations: an AT-S. These are usually found hauling artillery pieces in my forces. The AT-S was a design from the early 50s, and superceeded by the ATS-59G. To my-brought-up-in-New Zealand mind, it's got a definite "Hillary crossing the Antarctic" feel to it.

Travelling in a fried-out combi! On a hippy trail; head full of zombie...  Well, near enough, anyway. This is the Scotia UAZ-452 minivan; I will probably add some ambulance markings in the weekend to it to give it some sort of utility.

This is the van version of Scotia's UAZ-452. I will probably add some sort of diorama scene here, given the large expanse of available base, but I will have to buy some more crew figures and the like first, as I appear to have run out...

Tatra-111 trucks; one of which was already painted. Another of my Shapeways efforts - these ones have suffered from very noticeable "stepping" during the print process. These trucks can be used not only for Cold war Czechoslovakians, but also for WW2 Germans, being produced from 1942 to 1962 (by which date the cab had been given a more modern look).

H&R assault rafts. WW2 German, I believe, but who can tell the difference? Me, of course! Czechoslovakian ones were not even inflateable!

No idea why I have this - it's a Scotia decontamination vehicle. And why do I not need it? Because I've already made the Czechoslovakian equivalent of this Soviet vehicle, and printed it out via Shapeways! A stationary pair of these vehicles, each mounting a jet engine on the back, were supposed to decontaminant chemical warfare agents from a column of exposed vehicles driving between them. As a professional chemist, I have doubts about the efficacy of this... These vehicles were found as part of the divisional NBC battalion. WarPac forces took a lot of effort regarding counteemeasures for the C part of the NBC equation, even though it appears they naver had any serious intention of using themselves (unlike the N part, for which they had serious plans for...).  For example, FROGs were in service for over a decade before a chemical warfare warhead was even considered for them.

Another Scotia Soviet duplication, for which I have the Czechoslovakian equivalentalready printed out... It's quite a nice piece of kit, though.

A battery of BM-24 MRLs; another of my Shapeways creations. These weren't used by the Czechoslovakians. They were instead found in Soviet Tank Regiments in the 1960s, prior to being replaced by the BM-21 Grad: 12 per regiment. I made up the model since it's just an AT-S with a launcher on the back deck instead or a tarpaulin, so a relatively easy conversion..

And finally, this would appear to be a Scotia BAT, but it's missing what i consider to be the most important part of the protoype - the enormous dozer blade, which is a real shame, because the thing isn't easy to scratch build...

So, a bunch of rear-zone elements for the most part, but that's fine, logistics can be fun too!


Sunday, 22 November 2015

Brigade Commander

Our second game was something rather different from the first, what with using 1:300th moderns instead of 15 mm ancients, and with a new rules set to boot in place of my usual Modern Spearhead. The rules are called "Brigade Commander",  and cover both WW2 as well as moderns; Aaron suggested I take a look at them, because he had heard they were fast play. 

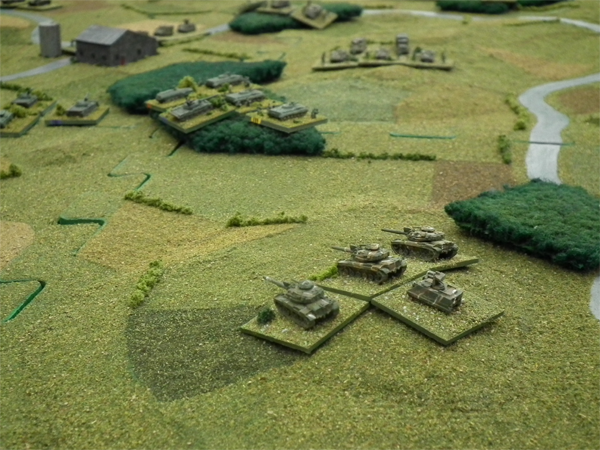
Initial set up, from behind my right flank.
We have a great problem when we pay Modern Spearhead in that we seem to take over an hour a bound on average, so getting a game actually fininished is a real task. I'm not one for trying new rules out willy-nilly, but something clearly had to be done, so I took a stab - they are a ten buck downloadable pdf, so I wasn't going to exactly break the bank taking a look. A quick once-over gave me the impression that would indeed be fast, and they also had a couple of mechanisms that were rather similar to a homebrew set I made back in 1989/90, so that was another plus: one was having attachments one lower down the command chain represented as smaller bases tagging along with the big base (only my rules were a "Division commander" equivalent, so one level higher up the command chain). Another was having effectiveness of fire vary with relative technology as opposed to have fixed effects - this is exactly the way forward IMNSHO, so I don't understand why more rules writers don't adopt it. I am doing the same in my may-they-ever-see-the-day ancients set too.

On the other hand, some bits were really confusing - especially the unit displacement rule - when you first spot a defender, it gets moved randomly to a slightly different position.  We just couldn't get our head around that one - why should a defending unit hiding in cover be teleported outside of it when it is first seen? So we just ignored that one.  (Maybe we simply didn't understand it properly - our brains aren't what they were when we were younger...)

Being a plonker, I left my printed-out copy at work, naturally, but we could still access the electronic version to play -  internet to the rescue! We rolled up our forces pretty well much randomly, going "by the book". I had Aaron's Americans as "stretched", so his force would be smaller (but naturally, the tanks are way better - their 105s are vastly superior to my 100 mm guns); my Czechoslovakians infantry/MICVs had a miniscule advantage over his infantry in M113 APCs in that I could let off anti-tank fire at a greater distance - needless to say, I never got to use it...

Yankee mechanised company in front of a T-55 company.
I planked down some terrain - which was four of my terrain mats, giving a 1.2 by 1.2 m board (i.e. 4 foot a side) with forests made of carpet tiles thrown over the top; these last I snagged from Rhys when I was last back in NZ, since they were now surplus to his requirements.  We ignored any hedgerows, given the basic unit was a company, rather than a platoon as in MSH. We also ignored difficult fields, but that was more because we entirely forgot about the possibility of having them being difficult!  It was one of a number of things we forgot during the course of the day (e.g. I couldn't find any of my bridge models, so no rivers could be used).

Aaron's game objective turned out to be "hold area against enemy" - he chose a hill just on his side of the centre line that had a good view of a lot of the board to be the key location.  Mine objective to exit at least 1/4 of my companies off his baseline.  I got two extra companies in compensation for him being able to take a defensive stance, further inflating the numbers discrepancy (he had 6 companies on table at the start, plus one as reinforcements; while I had 8 plus 3, respectively). The recommended 'base size' of company is extremely hazy in the rules. They talk about 1", 2", and 3" bases sizes in a single passage...  Since there is at least a defined ground scale (1" = 100 yards), I took that into consideration when decreeing we would use three MSH bases to represent a standard company, with ranges being taken to and from the middle one; the flanking ones would be to make sure they occupied a realistic amount of space.

Turn 6. Aaron (top) has been forced to retreat numerous times.
I had some good initial luck with me being able to get a good march onto the table through a timely "scurry" where everybody got to move:  this would appear to be, relatively speaking, generally better for the more numerous side if it happens on the first time - normally you get only three company activations a turn, so usually a smaller force gets a smaller proportion of its units to move. The first few turns saw most of our more lethal artillery assets (of which I had more) exhausted; whether it was wise to do so initially or later I didn't know, give it was our first game. And since this was a first game, there were no doubt many things we stuffed up rulewise too...

Once we really started coming to grips with each other, I kept scoring 1s or 6s on my "shock" dice, forcing Aaron's units to fall back constatantly. In fact, it looked like he was running out of room to retreat at some points, with some of companies falling back even beyond his HQ. On the other hand, my poor tankguns meant I was never in a position to land any "kill" dice on him, and my few assaults didn't work out. On the few occasions Aaron was able to actually get some shots of with his M60A1s, he was able to rip up my guys handily. I forgot to bring my smoke markers, so that part of the visual spectacle was AWOL; in the above picture we are using little 5 mm-a side coloured cubes to represent unit status. This should be done with appropriate dust, smoke, and fire markers...

Goddam Yankees! The American's are Aaron's own figures.
Anyway, I was making quite a lot of ground, but was taking quite a lot of casualties in the process. Eventually however, I not only started taking too many casualties, but got some "firefight" activations that prevented me from actually doing anything useful just when Aaron seized the initiative with a freshly rallied tank company that went on a rampage down my right flank, smoking up two companies in front of them, then sweeping round my flank (see left) and taking out two more.  Ouch!

Things were really really really not looking good for the Czechoslovakians at this juncture...
The casualties (Aaron's sole company lost at top).  Not pretty...

Now technically, I did complete my objective - I did get 3 companies of Aaron's baseline. But since he not only held his hill, but had but a single company rendered hors de combat while doing so, while I had lost seven (!) in getting my three off table, it was clear who the real winner was!

So what did I make of the rules? Well, they were indeed fast play. Very fast. You get maybe 6 to 12 companies total, and they are digital: they are either alive, or dead.  So no fiddling about with 'casualities' or the like as platoons get whittled down. No 'morale' as such to speak of, either - combat results can force you to halt, or retreat, but only on a company by company basis. And this is all fine. I'm not sure I like the way artillery was handled - will have to investigate more. Likely we mishandled it...

There are lots of things I would tweak in terms of 'army list' design - I think not having lots of attachments is likely to be more of a wasted opportunity than a useful simplification, but further play-testing will be required. Even if I don't end up liking everything, there is a solid core here that is very much worth investigating. The fact that we could slap a game together, starting with generating an OOB on paper, to packing it away after the game, in something like 4 hours maximum, was quite the revalation. It would probably take me 2 days to do that with MSH...


Populares!

Finally, some gaming! A welcome opportunity to get down to Aaron's came about today, so I packed the car with some 1981 Czechs and my terrain mats, while Aaron got some ancients stuff organised. The moderns game I will comment on in my next post, for first up was a game of "To the Stongest", which I have played just twice before, but thoroughly enjoyed it.

Aaron has by now built up a very respectable collection of late Republican Romans indeed, plus a bunch of western European enemies and allies. So I thought a game featuring the noble and glorious Sertorius on one side (that would be me, you understand), versus the villainous and unnamed optimates (Aaron, naturally...) would go down well. Aaron proposed a points budget of just 130 points each to keep things simple, so we had to cut down a bit on the troops present - Sertorius wasn't rated as "brilliant" for example.  My army, having large numbers of Lusitanian caetrati (light infantry) was a bit bigger than his, due to his larger numbers of more expensive legionaries.

Deployment, viewed from the rear of my left flank.
We rolled terrain as per the rules, and I was pretty satisfied with what I got; the flanks were dominated by rocky hills and the like, just right for my light troops to lurk in. Note the mats making up the playing field - see Aaron's post on these for details.

My centre was anchored between theses hills, as I thought it would be weaker than his, and I wanted to work the flanks. I had a unit of heavy horse and a unit of light horse on each flank, plus a bunch of light troops. Sertorius took my right, while the left and the centre had a sub-general each.
My light horse on the extreme right, working the flank.

As it turned out, Aaron's horse was slightly meatier than mine, with three heavies and one light unit as opposed to my two of each. Still, I had a lot of light troops to support them, and I figured the terrain was with me, so I pressed forward on both flanks, while keeping my centre back.

On my right, I moved up quickly, aided by Sertorius being there in person, keeping the activation points coming. Combat didn't go quite so well, however, with no rapid breakthroughs. I attempted some outflanking manoeuvres here, but not mcuh came of it, as my heavy cavalry were struggling, and Aaron was able to manoeuvre his own heavy cavalry to advantge. Soon my heavy cavalry here had been removed from play, and Sertorius had to transfer to the light horse, leaving my grand plans for attack in this sector in tatters.

The flanks are fully engaged, but the centres have yet to meet.
On my left, I similarly moved forwards, but failed to make any headway with my shooting.  Our cavalry clashed, and it was a more bloody affair than of the other flank.

I was able to take out Aaron's sole light horse unit, but unfortunately lost not only my own in the process, but also my general in the aftermath, thus starving my forces here of leadership. Over the subsequent turns Aaron was able to take out my heavy horse as well, but his remaining horse unit was unwilling to try and force the issue with my lght infantry holding the heights, stimmying his advance.

The view from behind Aaron's centre. All figures are his.
Having been bested on the flanks, my remaining hope lay with the centre. As it happened, I was not as weak here as I had feared I would be. We both had solid line of legionaries. Aaron had a second reserve line of veteran legionaries, but they were few in number. My second line was of Spanish scutarii, and thus not as strong, individually, but they were much more numerous, and thus could potentially take more of a beating before folding. So I moved forwards my centre to meet his, and the main lines clashed. The initial voleys of thrwoing weapons were resisted stoutly by both sides, and thus our front lines settled down to sword play.

The breakthrough! That's my sub-general rolling up his line...
And here luck went my way. Aaron's units could hit me well enough, but I saved an awful lot of hits, while my return strikes often went unsaved by him. Further, his activations went AWOL at critical points, leaving him unable to rally units, and leaving them very vulnerable to subsequent attacks. On my right flank, the crappy terrain frustrated him in being able to move his cavalry across to influence the centre, and likewsie on my left, the crappy terrain frustrated him there too. Terrain in hindsight that had been very well-positioned by myself! My superior numbers in the centre eventually wore his down, and a line swap did little to stem the tide, for his veterans were too few in numbers to resist my weightier centre. Eventually the legion led by my sub-general routed their oppoistes, cracking his line open, and the proverbial fat lady started winding for her aria...

Technically not yet "game over", but irretrievable...
With his centre split and being rolled up, soon four more of his six original legions routed, with just his own center general's legion holding on - barely. And with the equivalent of five legions in front of it, the writing was not merely on the wall, but spelled out a hundred times all over the forum...

A corker of a game, with lots of interesting decision points; a bunch of realistic outcomes, (with no senior general on the Roman side, Sertorius won, as he was wont to do...), and nothing happend on the table that jarred my sense of historical accuracy. I'm liking this system more and more! I guess the next step is to see how well it plays outside the classical Mediterranean...

Aaron's take here.


Monday, 24 August 2015

Trapped in the bocage...

My final Spearhead game with Rhys was a meeting engagement using Keith's scenario generator system; 650 points a side.  In keeping with our Normandy theme this week, we set up a table with plenty of terrain, including lots of bocage-type heavy hedgerows.

The table from what would become Rhys' left corner.  The water course counted as just a stream, so was fordable by all.

Rhys's force was taken from a German Panzer Division (1st SS) list - 4 rather small battalions (10 to 12 stands apiece), graded Regular.  Two were of leg infantry, each of which had an 88 stand in support, along with a stand of 120 mm Mortars, and two were armoured, with Panzer IV Hs and their accompanying half-tracks cross-attached.  Rhys had two small batteries of off-table artillery; 2 stands of 105 mm howitzers, and 2 of 150 mm.

Rhys had been telling me about a game he had recently where he had maxed-out on British field artillery.  25-pdrs might have crap attack factors, but the British ability to mass their fire over and above what any other nationality can do in Keith's scenario system proved cost-effective in his game, and he recommended I give it a go.  Sure, I said, I'm game!

So my on-table force was also 4 battalions-strong, each slightly understrength, but not greatly so, and larger than Rhys'; they were taken from a British infantry division list (15th Scottish), except for the tanks which were an independent Armoured Regiment, of Churchill VIIs (from 6th Guards Brigade), and whose three companies were parcelled out to the three infantry battalions.  In support, I had a full 18 stands of 25-pdrs, along with their corresponding 9 forward observer elements: one for each battalion per infantry battalion.  Thus nearly 1/6 of my points allocation was spent on FOs, and another 1/6 on the artillery itself.

German advance orders in red; British in blue; positional objectives are in yellow. I don't think the central one on Rhys' side is actually a valid one, but we nothing else in the centre that looked even this noteworthy...  Excuse the cropped off table - I didn't aim the camera properly!
Rhys opted to group his two infantry battalions together, on my left; they were tasked with taking the hillocks there; his 88s would be deployed in overwatch positions to cover the infantry's advance.  One Panzer battalion would be a central holding force, while the other would advance down the road on my right.

My three battalions were almost identical, each 21 elements strong  including the FOs.  I determined to defend on my right, anchoring myself on the village by the stream; while I would concentrate my attack on my left, and then sweep around toward the centre after the 10th move with timed orders.

Rhys' Panzer IVs move down the lane toward the village on my right while my 6-pdr element gets off some telling shots.
On my right, I secured the near village and adopted defensive positions as Rhys' tanks moved down the road.  The tall hedgerows here really limited manoeuvre and visibility.  My 6-pdr element, that had unlimbered just in time as the lead tank of his column moved into view, got off a lucky shot, suppressing it (factor 5 vs 6 isn't the best...), halting his advance temporarily, and allowing me time to consolidate my position and start calling in artillery fire.

Here's the same confrontation viewed from Rhys' side of the board.  The forests are cut up brown-fibre doormats with flock on top - easy to make and rather effective, visually.
On my left, I advanced boldly, and since Rhys did much the same, we were soon in close contact.  My artillery fire over here wasn't initially very effective (although that would soon change), but the constant casualties it inflicted gave me the upper hand.  And my Churchills weren't suffering too much from his 88 batteries either, as they swept up my flank, past a developing fire fight between two woods, and onwards...

The view from Rhys's centre toward my left flank; his troops are bottom- to mid-right.  I had the advantage both in numbers and in fire support here...

In the centre, there was some exchange of fire between our tanks where visibility allowed, which went to my advantage, aided by the Churchill VII's formidable 8 Defence factor, and this tied up his central force, preventing it from aiding both his left and right flanks. On my left, my artillery dice suddenly started to roll hot (oooh look at that - 4 sixes !), and Rhys' casualties mounted alarmingly.  By turn 6, I had forced his first battalion there to check morale, which it failed, and the survivors started legging it toward their rear; they didn't survive the next turn however.

A bit of smoke won't help Rhys' batallion here - the lane to the left is littered with dead Panzer IVs (which we keep forgetting to provide wrecks for...)
On my right, Rhys' tanks were taking too many losses from a combination of artillery fire, PIATs from behind hedgerows, and AP shells; by turn 8 this battalion had also been forced to turn tail.  Since Rhys had only bagged a single victory objective - which he was about to lose, whereas I had not only already broken two battalions, taken 2 objectives, and was about to seize 2 more, the proverbial operatic fat lady was clearly in fill aria mode by this stage!  I'd only lost 8 elements in the process, and Rhys was just 1 stand off losing his 3rd battalion...

So what were the lessons learnt?  Well apart the the obvious ones we all know about 6s beatings 1s, the British fire concentration, although appearing a non-starter to the casual eye, proved its worth.  Individually, each gun isn't up to much, but the ability to keep a sustained massed barrage going at the crucial point of contact - assuming you don't dilute your attack too much - can be very much worth it.  I'm wondering if the ability to do this with heavier pieces than 25-pdrs would be too overwhelming.  Test-driving required!

The other thing I learned were some further inanities of the points system.  Apparently the WW2 points were developed by the Auckland club and thus pre-date Keith's involvement; and they really need reviewing.  For example, a Pz IV H has a +1 attack factor on a Sherman, and a longer range.  For this it pays a 20% premium in points (4 points), which seems a bit steep, but is perhaps arguable.  But a Churchill VII pays just 10% extra to get 2 extra defence factors over a Sherman (and 3 on the side armour!), albeit while losing some speed in the process, making it very good value in comparison:  there is no way 11 Shermans are as good as 10 Churchill VIIs, and even more obviously, there is now way 11 Panzer IV Hs are as good as 12  Churchill VIIs - indeed, 13 of them  aren't!  Likewise, a T-34/76 costs the same as a Sherman, despite moving faster, and having all other factors the same.  Even worse, a Panther costs more than an IS-2, despite the IS-2 apparently being better, or at worst, equal, in every respect, factor-wise!

Rhys' game account here.